Hi!
I would like to start saying that this review brought a lot of emotions out for the night! :p
When I was a little girl, I spent looong hours playing with my Barbie's Kitchen Set. When I was 7 yrs old, my dad build me a doll house (the regular ones were too small for me since I was a really tall kid! hehe). I truly loved playing house and playing kitchen, so this kit allowed me to relived my childhood in a way.
There are a ton of reviews of the product on YouTube, however, I couldn't find one that was specific about flavors and textures. Hell, I even thought that this was sweet and it is not! LOL So I decided to be a bit more specific about certain things that you don't see or hear in the videos. All of the instructions on the box are in Japanese (duh!), so at first it was a little bit confusing when it came to what is what. The reason for this, is because 4 of the bags that have the powders look kinda alike. The colors are red, magenta, pink and orange. In most videos you can barely tell which one is what color. So here I will also help you with that.
Japanese DIY kits are extremely popular, EVERYWHERE! Since these kits are considered "food technology" (look it up! I'm not making this shit up lol) they are really expensive. They are fun to make and fun to eat, but be ready to pay $7 - $10 or more for a kit like this one. Trust me, they are worth every single penny spent.
So, lets get down to business!

Once you open the box, you will find this little bag with everything inside. You can also cut this part and use it as a picnic blanket.

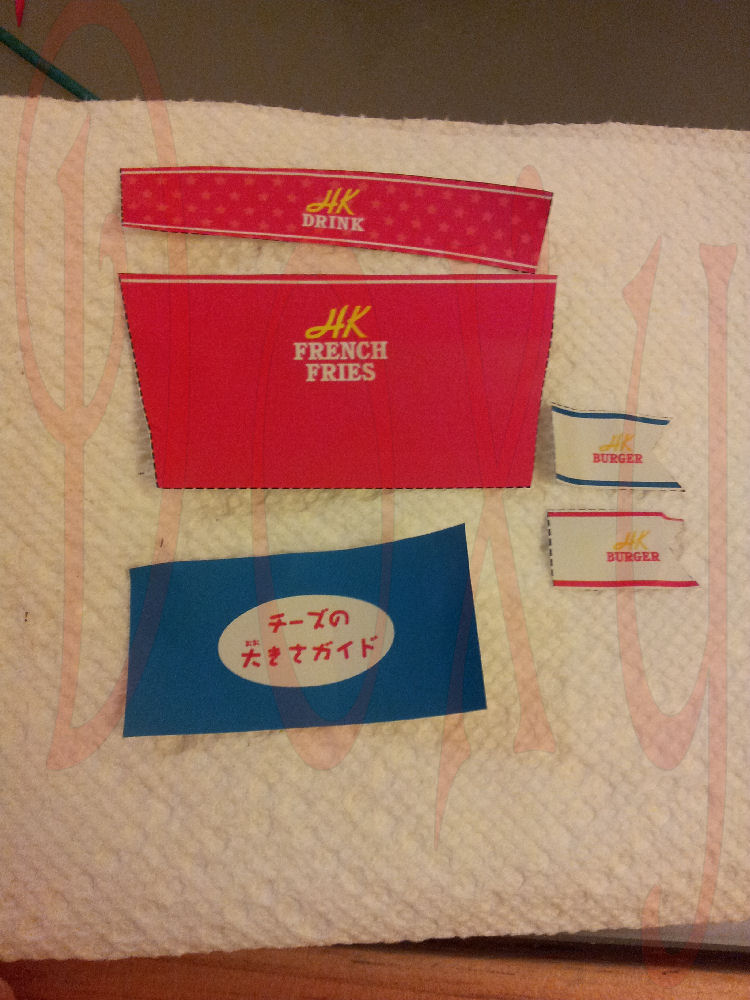
This is the back of the bag. Here you find the template for the cheese and the label for the soda cup, the fry bag and the burger flags.

Before you start unpacking, let me advise you of the additional items you will need. Paper towels, scissors, tape, toothpicks and a cup of water. You will really need them (mainly the water lol).

Here you got your bake and measuring ware, plastic knife and spatula (just like the one SpongeBob uses) and the soda cup.

Now here is where you will go, "Thanks Nai!" lol This was a true brain fart! LOL I though the blue would be the soda (association with ice), orange for the bread and red would be the ketchup (logic), but Kracie didn't see things the way I saw them when I unpacked the items! lol

If you are like me that once you start something you wanna get it all done right and right away, you will want to start by cutting everything you will need to use. Cut the bake-ware and the measuring-ware (the little triangle thingy on the corner) and cut all of the "decals". This way you can start cooking and preping.

Tape to the back of the cup.

Tape to the silver part of the flag.

Tape side to side on the back and then fold the bottom a bit and tape to the back.
Now lets get cookin'! This are all powders that you mix with water and "done". You have to be precise with the measurements. On the back of the box you will see the instructions and will tell you how much water you need to make what.
You don't really need to follow a specific order, but by logic the soda should be the last one to make. I will present them in the order in how I made the.

Add the water and mix with the content of the Orange Pack and form a very compact paste. Place in microwave oven for about 30 seconds (depending on your microvave, can be 30 or more).

After it cools a little, you can get it out of the mold. You will notice it have the grooves of the mold. You can use that as a guide to cut them like fries.

The knife included is pretty good and safe, but don't expect perfect cuts.

Place them in the baggy and french fries are done!
I have the (good or bad) habit of smelling EVERYTHING I'm about to eat. Once I open the packet, my first impression was "this smells like mashed potatoes". After you cook them, the smell of mashed potatoes gets stronger.
Moving on to the bread and meat.
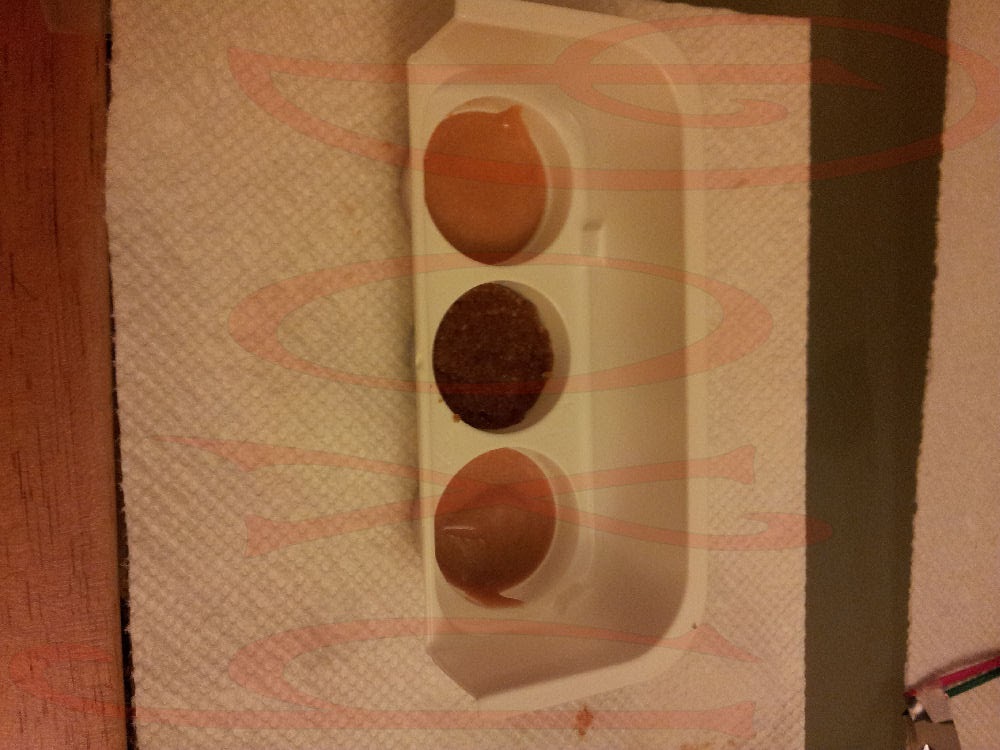
These you don't mix in the same spot you are going to bake them, you use the square "mixing bowl" and then add the mix to the corresponding spot. The middle one is for the meat. It have the texture of meat at the bottom. The sides are for the buns since they have the dome shape at the bottom.

After 30 seconds on the microwave you can see that the bread actually rose. To me that was mind blowing!!!
When adding the meat and the bread mix to the molds, you have to use your baking skills! For the meat, press the mix down with your fingers. It's gummy like, so it needs a little push to get in place. For the bread, once you added the batter YOU MUST hit the mold slightly against the palm of your hand so there are no air pockets. I've seen a lot of videos where this in not done and the result is a bun with a nasty air pocket at the bottom. Also, I suggest that you leave the mold to cool off after you get it out of the microwave. It is really hard to get them buns out while the mold is hot. The bread doesn't really have a smell, but the meat does. It smells just like the meat flavor ramen noodles!!!
And then... the cheese!

Using the "mixing bowl", add the water and the powder mix. Once it is well mixed, you can mold it into a little ball and place it on the cheese template.

Its a bit hard to get it perfectly on the template since the cheese have a gummy like texture to it.

Now cut in two perfect squares, and done! We got cheese! Yay!
The cheese doesn't have a really strong cheesy smell to it, but it does smell a little like Chiz Wis! hehe
Let's go back to them buns!

Now that they are cool, you can get them out of the mold. With the tip of the knife you can start to separate them and then with a few bumps it will fall out.

Cut them all in halves. You will have two meats and two pairs of buns. Its a bit hard to cut the meat so you might have to get a real knife. If like me, you wanna stay in character, use the plastic knife and get ready to rumble lol.
Ketchup for them fries!

Ketchup is not that big of a deal! Just add water and mix! I used the flash on this pic cause I wanted the gloss to show!
Hamburger, ASSEMBLE!
Let's see if I can remember how to do this! lol

Buns

Buns, Meat

Buns, Meat, Cheese

Buns, Meat, Cheese, Ketchup
Yay!!! I did it! lol
I bet you are all saying, "But, but, but where is the soda!?". I didn't take pics of the soda :( I took video! XD So lets see how soda is made!
When it comes to the soda, its all show! LOL I loved this part cause of all of them fuzzy and soda pop sounds. It was really neat. When I opened the packet I didn't even have to get close to smell the soda, as it hit me right in the nose! lol really strong soda candy like smell.

Here you have it! The whole meal! My sister is a big collector of miniature tea sets, so I used some of the plates to serve the burgers and the ketchup. For size reference, the burgers are a bit smaller than a quarter and about an inch tall (if you make them as a single hamburger, you can also make it a double lol).
If you are wondering how does it all taste like.... well let me tell you.... it taste freaking amazing! It is all kinda weird since you make it like if you were playing kitchen! The taste is pretty good, specially for something that you make by just adding water. The fries taste like mashed potatoes, the buns taste like sweet rolls, the meat taste like meat flavor ramen noodles, the cheese taste like canned cheese (even though it smells like Chiz Wis), the ketchup taste like ketchup (lol it kinda taste like tonkatsu sauce, which in all reality is a sweeter version of the ketchup we know) and the soda tastes just like soda flavored candy.
There are a lot of different kits. From donuts to sushi. Some are sweet and some are savory, like this one. Okashi Noms will have the most popular flavors available at PR Comic Con.
Presentation: 5/5
Flavor: 4.5/5Variety: 5/5
For all your Japanese snacks visit us! OKASHI NOMS PR


